


K Series Swap Intake Manifold Coolant Adapter Plate For Honda Acura K20 K24 🇺🇸
K Series Swap Intake Manifold Coolant Adapter Plate For Honda Acura K20 K24 🇺🇸
Description:
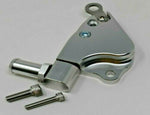
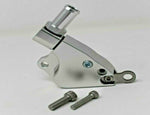
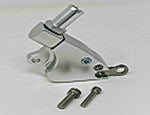
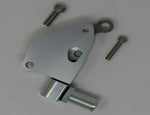
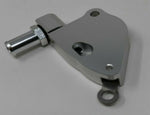
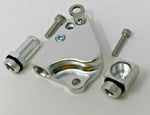
- The K24 Intake Manifold Adapter is a simple and easy way to install a K20-style manifold on K24 heads.
- The recirculation fitting on K24s is typically part of the intake manifold which isn't on K20 intake manifolds.
- We have designed the adapter to work with all K24 heads including the K24Z-Series (R40) heads.
- This can also be used to install K20 manifolds or cut RBC manifolds on 9th gen Civic si as the water bypass is slightly different and you will not need an intake manifold adapter when using the adapter.
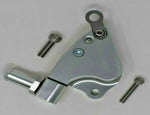
- The adapter also features a 1/8 NPT port for a coolant temp sensor commonly used in swap cars.
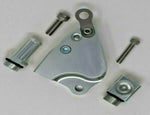
- The Intake Manifold Adapter can be installed either using our spring-loaded tab or by tapping the head.
- We use Honda Bond or a similar gasket maker as it provides a strong seal and when using the spring-loaded tab when the adapter isn't under pressure there will be no chance of a leak.
- The spring-loaded tab holds the adapter down with constant spring pressure to ensure a tight fit and seal.
- The other option is using the provided blind hole you can easily tap the head for the second hole.
- Tapping the head will require a 6.5mm drill bit (to finish the blind hole in the adapter), 5mm drill bit (to drill the head), and M6x1.0 Tap.
Ensure when installing that the adapter gets mounted directly to the head (Do Not Install A Gasket Between The Head and The Adapter). Begin by using the 6.5mm or ¼ drill bit to finish the blind hole in the adapter. You then want to install the manifold and adapter on the head. This will ensure you are properly positioning the hole. Once you have marked where you want to drill remove the manifold and adapter. Place tape or plug the holes on the head for intake and coolant to prevent anything from getting inside. You will use a 5mm or 13/64 drill bit to drill the head to a depth of at least 11mm (the depth of the bolt) but shouldn’t need more than 14mm. You can apply tape on the drill bit to ensure not to drill too deep. Once you drill the hole you will run your tap. Use a M6x1.0 tap and lube and do it slowly. Be careful not to tap too deep. You can start the thread with a standard tap but you should finish it using a bottoming tap. This will allow the bolt to use most of the tapped hole. Slowly start to tap the head and check fitment of your adapter often. You want the adapter to hold snug but not tap the hole too far.
Product Disclaimer:
Emissions Equipment Tampering Warning: In many states, tampering with your vehicle’s emissions equipment is unlawful. Our products are designed and sold for sanctioned off-road/competition non-emissions controlled vehicles only and may never be used on a public road or highway.
Using our products for street/road use on public roads or highways is prohibited by law unless a specific regulatory exemption exists (more information can be found on the SEMA Action Network website www.semasan.com/emissions for state-by-state details in the USA).
CARB-Restricted Areas: CARB-Restricted products, will not be shipped to state of California under any circumstatences.
Official Air Resource Board Link: ARB State Adoption Link
Customer Responsibility: It is the responsibility of the installer and/or user of this product to ensure compliance with all applicable local and federal laws and regulations. Please check with your local vehicle authority before purchasing, using, or installing any of our products.
By proceeding with the purchase and use of our products, customers affirm their commitment to adhere to the terms outlined in this comprehensive product disclaimer. We reserve the right to update this disclaimer as necessary.
1. General
All orders are subject to stock availability. We strive to maintain accurate stock counts on our website, but in the event of a stock discrepancy, we will fulfill the available items and contact you to arrange either a refund or a restocking option for any backordered items.
All shipping and processing times are in business day terms (Monday to Friday). Weekends and holidays do not count toward processing or shipping times.
2. Shipping Costs
Shipping costs are calculated at checkout and include the following options:
- Economy Shipping: 5-7 Business Days – Free Shipping
- Standard+ Shipping: 3-5 Business Days – $19.95 (flat rate)
Shipping fees apply across all inventory and will be charged at the time of purchase. Currently, we ship only to the mainland US states. We do not ship to Alaska, Hawaii, American Samoa, Guam, Northern Mariana Islands, Puerto Rico, or the U.S. Virgin Islands.
2.1 Shipping Refunds
Shipping charges are non-refundable once an order has been submitted to the fulfillment team unless the shipment is delayed beyond the promised delivery window. The shipping window starts the next business day after the fulfillment processing window of three business days.
3. Delivery Terms
3.1 Domestic Shipping Transit Times
Domestic shipments generally take 2-10 business days to arrive, depending on the shipping method chosen at checkout.
- Economy Shipping: 5-7 Business Days
- Standard+ Shipping: 3-5 Business Days
Delivery timelines are subject to carrier performance and tracking details.
3.2 International Shipping Transit Times
International shipments typically take 4-22 business days, depending on the courier and the destination. Please contact us at support@partsagent.com for international shipping quotes.
3.3 Restricted Shipping Addresses
We do not ship to Alaska, Hawaii, APO/FPO addresses, or PO Boxes.
4. Dispatch Time Frames
4.1 Dispatch Time
Orders are usually dispatched within three business days after order confirmation. Our warehouse operates Monday to Friday, excluding national holidays. Delays may occur, but we strive to minimize them.
4.2 Change of Delivery Address
You may request a change to the delivery address anytime before the order is dispatched by contacting us at support@partsagent.com.
4.3 Out of Stock Items
If an item is out of stock, we will ship the in-stock items and either backorder or refund the out-of-stock items based on your preference.
4.4 Delivery Time Exceeded
If your order's delivery time exceeds the expected timeframe, please contact us to initiate an investigation with the shipping provider.
5. Tracking Notifications
Once your order has been dispatched, you will receive a tracking link to monitor your shipment's progress. Updates depend on the shipping provider.
6. Lost, Stolen, or Damaged Parcels
6.1 Shipping Insurance
Unless shipping insurance is purchased, Parts Agent is not liable for parcels lost, stolen, or damaged in transit.
For additional protection, we offer shipping insurance through Captain Insure, which covers up to 80% of the item's value in case of loss or damage. Insurance claims can be filed via support@partsagent.com with details such as order number, description of the issue, and supporting photos if applicable.
7. Duties & Taxes
7.1 Sales Tax
Sales tax will be calculated and applied at checkout based on your shipping address.
7.2 Import Duties & Taxes
For international orders, import duties and taxes may apply upon arrival in the destination country. Parts Agent is not responsible for these charges. If you refuse to pay duties, the goods will be returned to us at your expense, and a refund will be issued for the item(s) minus the cost of return shipping.
8. Cancellations
If you wish to cancel an order before it has been dispatched, please contact us via email. Once an order is dispatched, our Returns & Refunds Policy applies.
9. Customer Service
For any inquiries or issues related to shipping, contact us at support@partsagent.com. Our team is available to assist you with any questions or concerns.
1. Qualifying Returns
To return or exchange a product, you must first contact us at support@partsagent.com to obtain a Returned Merchandise Authorization (RMA) number. You are responsible for covering all shipping and associated costs for returning the product. Please note:
- Initial shipping costs (including free shipping promotions) are non-refundable.
- A restocking fee of up to 30% applies to all returns, unless otherwise stated at our discretion.
- Products must be returned in their original, unused condition.
Return Timeline:
Returns or exchanges will not be accepted after 30 days from the date of sale. Used products or products missing parts are not returnable or refundable.
Non-Returnable Items:
- Custom orders, non-stocked, or special-ordered items.
- Electronics, such as hardware or software tuners.
Upon receiving the product, we will process your refund within 7-10 business days. Refunds will be issued to the original payment method.
Note: We reserve the right to reject returns or exchanges at our discretion.
2. Warranty Claims
We honor valid warranty claims submitted within 60 days of purchase, provided they are accompanied by repair documentation from an Automotive Repair Shop. Customers must pre-pay return shipping, but we will reimburse this upon a successful warranty claim.
Warranty Claim Process:
- Claims will be processed within 30 days of receiving the returned item.
- The warranty covers only the purchased part, not associated costs (e.g., labor, freight).
- If a warranty claim is confirmed, you may choose between:
Note: Exchanged items under warranty do not carry an additional warranty, and the original 60-day warranty does not extend to the replacement part.
3. Return Shipping
Customers are responsible for return shipping costs unless otherwise stated at our discretion. Returns must be arranged and shipped back within 14 days of receiving an RMA; otherwise, the claim will be closed and the order will no longer qualify for a return.
4. Refund Processing
After we receive and inspect your returned item, we will notify you via email about the status of your refund request.
Approved refunds will be processed within 5-7 business days. Refunds cover the product value only; shipping charges are non-refundable unless otherwise stated at our discretion.
5. Package Delivery & Shipping Insurance
Parts Agent offers shipping insurance through Captain Insure, which protects your shipment against loss or damage during transit. Approved claims cover up to 80% of the item’s value. However, the cost of shipping insurance is non-refundable.
To file a claim:
- Please reach out to us via email at support@partsagent.com
- Provide the following:
Upon claim approval, you may choose between a refund or a reshipment of the package. If necessary, we may request additional information to process your claim.
We aim to provide excellent customer service and support throughout the return and refund process. Should you have any questions, feel free to contact our support team at support@partsagent.com.
Q: Can I cancel my order?
A: After placing your order, you have 12 hours to contact our customer service and request order modifications or a cancellation. After 12 hours, your order has already been placed in production and can no longer be modified.
Q: What forms of payment do you accept?
A: We accept payment via major Debit and Credit Cards such as American Express, Diners Club, MasterCard, JCB, and Visa.
Q: Can I track my order?
A: Yes! Once your order is shipped, you will receive an email with a tracking number that you can use to track your package’s progress.
Q: What is your return policy?
A: We offer a 30-day return policy for all unused and unopened items. Please visit our return policy page for more information.
Q: How can I contact customer support?
A: You can reach our customer support team by emailing sales@partsagent.com or by using the contact form on our website. We strive to respond to all inquiries within 24 hours.
Q: Do you offer discounts for bulk orders?
A: Yes! We offer bulk order discounts. Please contact us for more information.

All orders qualify for our free economy shipping service

We accept Visa, American Express, Paypal, Mastercard, Discover, JCB, and Union Pay

Shipping insurance is available for protection against loss, damage, or theft

Our support team is always available via email: support@partsagent.com


RECENTLY VIEWED PRODUCTS